qemu模拟的riscv ubuntu实现桥接 1 2 3 4 5 6 7 8 9 10 11 12 13 14 15 16 17 18 19 20 21 22 23 24 25 26 27 28 29 30 31 32 33 34 35 36 37 38 39 40 41 42 43 44 45 46 47 48 49 50 51 52 53 54 55 56 57 58 59 sudo brctl addbr br0 cat /etc/qemu/bridge.conf 确认allow br0 sudo chmod u+s /usr/lib/qemu/qemu-bridge-helper sudo brctl addif br0 ubuntu网卡 qemu-system-riscv64 -machine virt \ -nographic \ -smp 4 \ -m 8G \ -bios Fedora-Developer-Rawhide-${VER}-fw_payload-uboot-qemu-virt-smode.elf \ -object rng-random,filename=/dev/urandom,id=rng0 \ -device virtio-rng-device,rng=rng0 \ -device virtio-blk-device,drive=hd0 \ -drive file=Fedora-Developer-Rawhide-${VER}-sda.raw,format=raw,id=hd0 \ -netdev tap,helper=/usr/lib/qemu/qemu-bridge-helper,id=hn0 -device virtio-net-pci,netdev=hn0,id=nic1 qemu-system-riscv64 \ -machine virt -nographic -m 2048 -smp 4 \ -bios /usr/lib/riscv64-linux-gnu/opensbi/generic/fw_jump.elf \ -kernel /usr/lib/u-boot/qemu-riscv64_smode/uboot.elf \ -device virtio-net-device,netdev=hn0,id=nic1 -netdev tap,helper=/usr/lib/qemu/qemu-bridge-helper,id=hn0 \ -drive file=ubuntu-20.04.2-preinstalled-server-riscv64.img,format=raw,if=virtio //桥接启动命令。或者 这个也是没毛病的。 qemu-system-riscv64 -machine virt -nographic -m 2048 -smp 4 -bios /usr/lib/riscv64-linux-gnu/opensbi/generic/fw_jump.elf -kernel /usr/lib/u-boot/qemu-riscv64_smode/uboot.elf -device virtio-net-device,netdev=hn0,id=nic1 -netdev tap,helper=/usr/lib/qemu/qemu-bridge-helper,id=hn0 -drive file=ubuntu-20.04.2-preinstalled-server-riscv64.img,format=raw,if=virtio 如果启动失败,先用ps -ef | grep riscv64查看正在占用的进程,然后注意第二列为进程号,直接kill -9 进程号即可 qemu-system-riscv64 \ -machine virt -nographic -m 2048 -smp 4 \ -bios /usr/lib/riscv64-linux-gnu/opensbi/generic/fw_jump.elf \ -kernel /usr/lib/u-boot/qemu-riscv64_smode/uboot.elf \ -device virtio-net-device,netdev=eth0 -netdev user,id=eth0,hostfwd=tcp::2222-:22 \ -drive file=ubuntu-20.04.2-preinstalled-server-riscv64.img,format=raw,if=virtio //这是普通启动,非桥接 -netdev user,id=eth0,hostfwd=tcp::2222-:22 编译suricata时要加上--build=riscv64 编译suricata之前要先安装rust并且安装cargo,并且掌握其编译软件的命令。 对cargo进行换源,然后记得安装证书库,即 sudo apt-get install --reinstall ca-certificates 然后再cargo install --force --debug --version 0.14.1 cbindgen 发现编译错误,然后应该装nightly稳定版本而不是beta测试版,卸载rustc改装rustup 如果你用命令“curl https://sh.rustup.rs -sSf | sh” 安装rustup失败,提示上述error,则可参照下述方案解决问题: 上述error的意思是你已经安装了rustc,而装rustup是要求不能预装rustc的,因此,你需要先把旧的rustc卸载掉,再重新装rustup,即可; 1.sudo apt-get remove rustc 卸载rustc 2. curl https://sh.rustup.rs -sSf | sh 重装rustup,安装步骤参考 https://skyao.io/learning-rust/installation/linux.html
注意正确打开方式
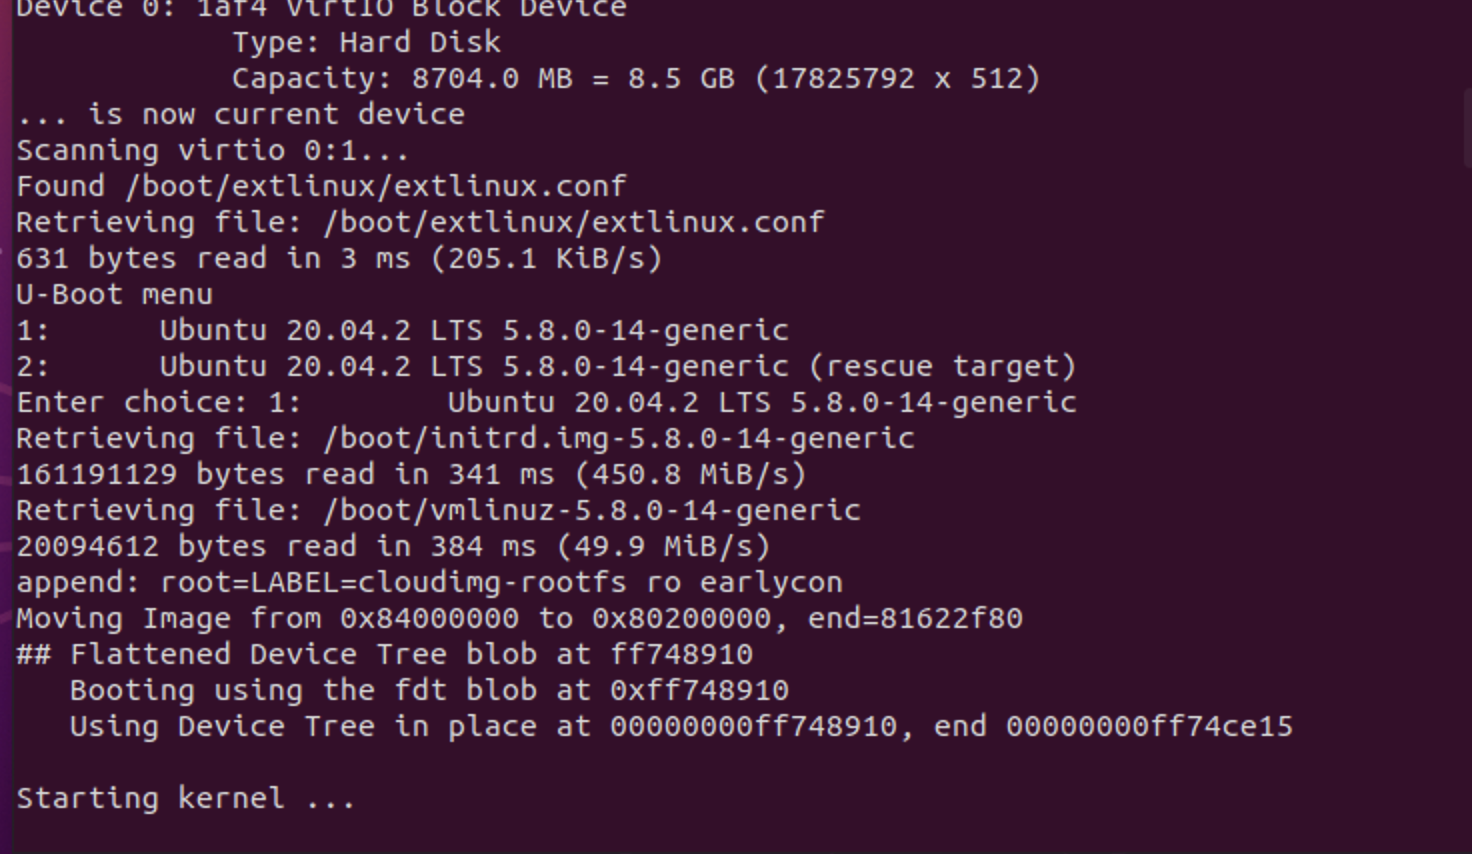
uboot报错注意
1
2
3
4
5
6
7
8
9
10
11
12
13
14
15
16
17
18
19
20
21
22
23
Device 0: 1af4 VirtIO Block Device Type: Hard Disk Capacity: 8704.0 MB = 8.5 GB (17825792 x 512) ... is now current device Scanning virtio 0:1... Found /boot/extlinux/extlinux.conf Retrieving file: /boot/extlinux/extlinux.conf 631 bytes read in 3 ms (205.1 KiB/s) U-Boot menu 1: Ubuntu 20.04.2 LTS 5.8.0-14-generic 2: Ubuntu 20.04.2 LTS 5.8.0-14-generic (rescue target) Enter choice: 1: Ubuntu 20.04.2 LTS 5.8.0-14-generic Retrieving file: /boot/initrd.img-5.8.0-14-generic 161191129 bytes read in 341 ms (450.8 MiB/s) Retrieving file: /boot/vmlinuz-5.8.0-14-generic 20094612 bytes read in 384 ms (49.9 MiB/s) append: root=LABEL=cloudimg-rootfs ro earlycon Moving Image from 0x84000000 to 0x80200000, end=81622f80 ## Flattened Device Tree blob at ff748910 Booting using the fdt blob at 0xff748910 Using Device Tree in place at 00000000ff748910, end 00000000ff74ce15 Starting kernel ...
这是正常启动,出现这样就对了。如果出现U-Boot menu下面四个选项,或者选项并不是这两个,将无法正常启动,也就是会在启动中看到错误,错误是由我们前期正确启动进入riscv-ubuntu虚拟机后,对其进行了软硬件升级导致,导致版本升级和不再兼容,所以目前我们应拒绝一切升级。在成功的流程下记得保存快照,这是必要的。

 wechat