cryptography
我们平时的key, cer等等密钥文件,打开时并不是我们喜欢的n,p,q的公私钥形式,而是已经编码好的形式,而编码的规则就是基于X.690标准中的ASN.1的编码格式:Basic Encoding Rules(BER), Canonical Encoding Rules(CER), Distinguished Encoding Rules(DER).
The BER were origin rules laid out by the ASN.1 standard for encoding data into a binary format.The rules used octets(8bit bytes) to encode data.
X.680 defines a syntax for declaring data types, for example: booleans, numbers, strings and compound structures. Each type definition also includes an identifying number.
X.680 defined several primitive data types, like BooleanType, IntegerType, OctetStringType. Types are associated with a class. For example, the primitive types are part of the universal class. There are other classes, including application, private and context-specific, which are used to specific applications.
Conbined, the class and type from a tag, which therefore corresponds to a unique data definition. X.690 rules are for encoding those tags, data values, and the lengths of that encoded data.
BER encoding

This is the structure of BER encoding including three or four components. Note that if a Length is zero, namely there are no Contents octets, e.g. the NULL type. The End-of-Contents octets are only used for the indefinite form of Length.
openssl
This note is from the book \
If we want to check the version of openssl, because sometimes a wrong version will cause the error.
1 | openssl version -a |
you will find how your OpenSSL was compiled and where is the OPENSSLDIR, which tells you where OpenSSL looks for its default configuration and root certificates.
building OpenSSL
we can download it and build it by ourselves
1 | ./config \ |
—prefix makes sure to install OpenSSL to a private location that doesn’t clash with the system-provided version.
The other important option is no-shared, which doesn’t use static linking and makes self-contained command-line tools.
then we can build
1 | make |
we can use ‘man’ to learn specific utility.
1 | man openssl-ciphers# will give you detailed information on how cipher suites are configured. |
or
1 | man openssl-enc |
Build a trust store
The trust store is a collection of trusted root certificates.OpenSSL doens’t come with a trust store, so you can use it built into your operating system.
In ubuntu, you can use update-ca-certificates to replace the contents of the /etc/ssl/certs
Mozila put a lot of effort to maintaining a transparent and up-to-date root store for use in Firefox. It is opensource
1 | https://hg.mozilla.org/releases/mozilla-beta/file/tip/security/nss/lib/ckfw/builtins/certdata.txt |
Unfortunately its certificate collection is in a proprietary format, which is not of much use to others as is. To convert Mozila’s root store, we download
1 | https://raw.githubusercontent.com/curl/curl/master/scripts/mk-ca-bundle.pl |
it will fetch the certificate data from Mozilla and convert it into the PEM format.
1 | ./mk-ca-bundle.pl |
key and Certificate Management
Users wish to configure and run a web server that supports SSL. That process consists of three steps:
1 | (1)generate a private key |
Key Generation
key algorithm: we usually use RSA and ECDSA in our certificates.
key size: the default for RSA keys used to be 512 bits,which is insecure. Today, 2048-bit RSA are considered secure, or 256 bits for ECDSA.
Passphrase: using a passphrase with a key is optional, but recommended
To generate an RSA key, we use genpkey
1 | openssl genpkey -out fd.key \ |
Here I specific that the key be protected with AES-128. You can also use AES-256(with -aes-256-cbc)
Note: By default, OpenSSL will set the public exponent of new rsa to 65537.
When we use the genpkey command, the generated private keys are stored in PKCS #8 format, which is jest text
1 | cat fd.key |
and if we want to see the detailed data like n and e in the private key, the command can be
1 | openssl pkey -in fd.key -text -noout |
the the datas will be exhibited.
If you only want to have the public part of a key, the command can be
1 | openssl pkey -in fd.key -pubout -out fd-public.key |
The process is similar for ECDSA keys
1 | openssl genpkey -out fd.key \ |
for web server keys, you are generally limited to only two curves that are widely supported: P-256 and P-384.
The recent additions ed25519 and so on are also supported, but they are different types of curves and have to be specified using the -algorithm switch
1 | openssl genpkey -algorithm ed25519 |
python cryptography algorigthm
note: Contents are from my accumulating writeups of many CTF competitions.
hex replacement bruce
This is a easy rsa that some letters of the p are substituted in terms of ‘FC’, the ‘FC’ may be the same in the previous p, and also can be ‘9F’ in the previous p.
1 | import subprocess |
Apparently the Crypto library and itertools library are very important. The itertools.product can produce all the possible combinations of the tuples.
AES decode
1 | from Crypto.Cipher import AES |
So this is an AES cryptography problem, firstly we introduce AES cryptography.
AES algorithm
The properties are:
1 | The size of grouping is 128-bit. |

This is a introduction graph.
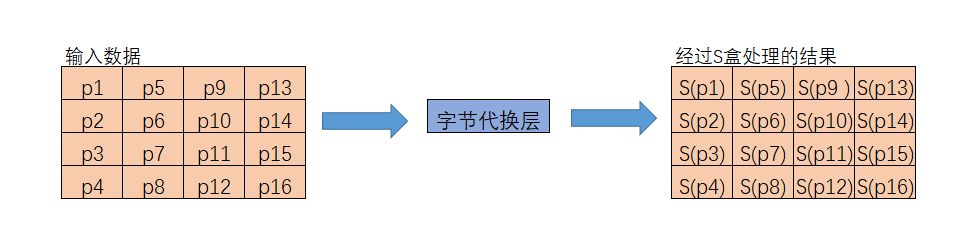
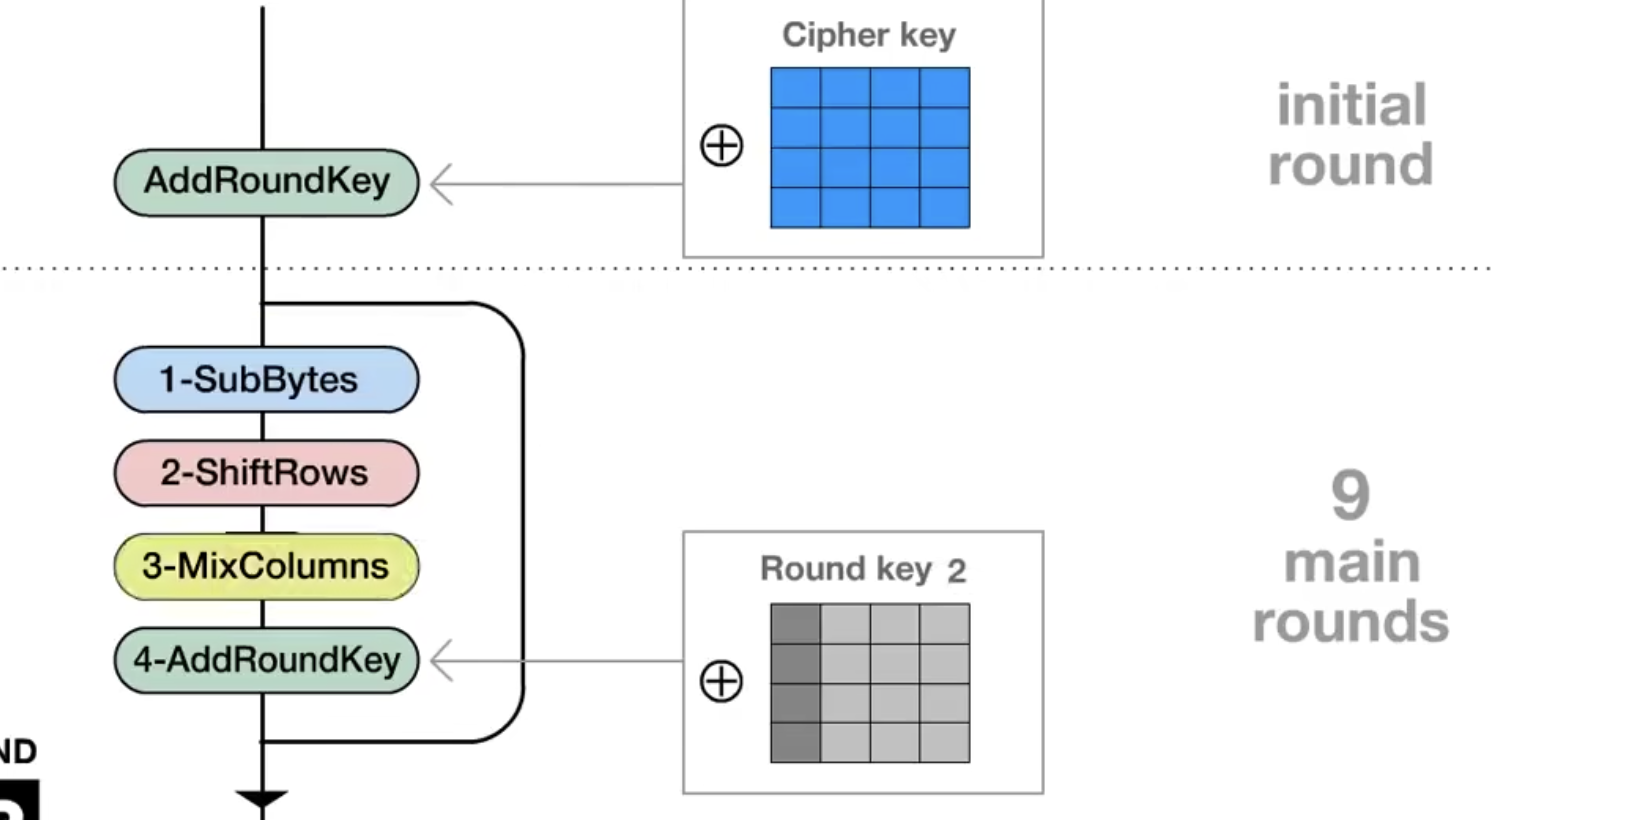
There are mainly four operations in AES algorithm, Add Round Key(轮密钥加), SubByte(字节代换), Shift Rows(行位移层), column mix(列混淆层). The plaintext x and the secret key k are both 16-Byte data.
The law of the order of the data is like below graph.
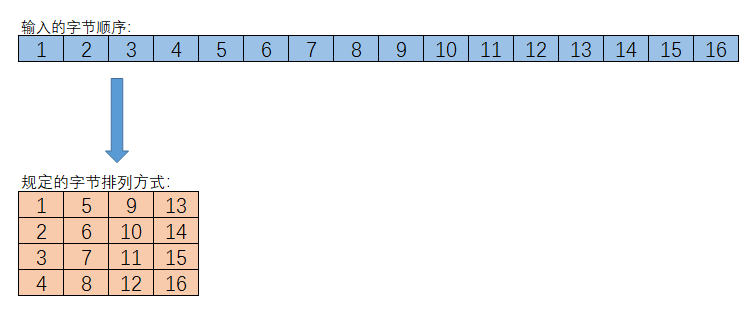
And the ciphertext has the same reading method as above, namely obtaining a string sequence from a matrix with numbers.
Now looking at the principle graph of AES algorithm.
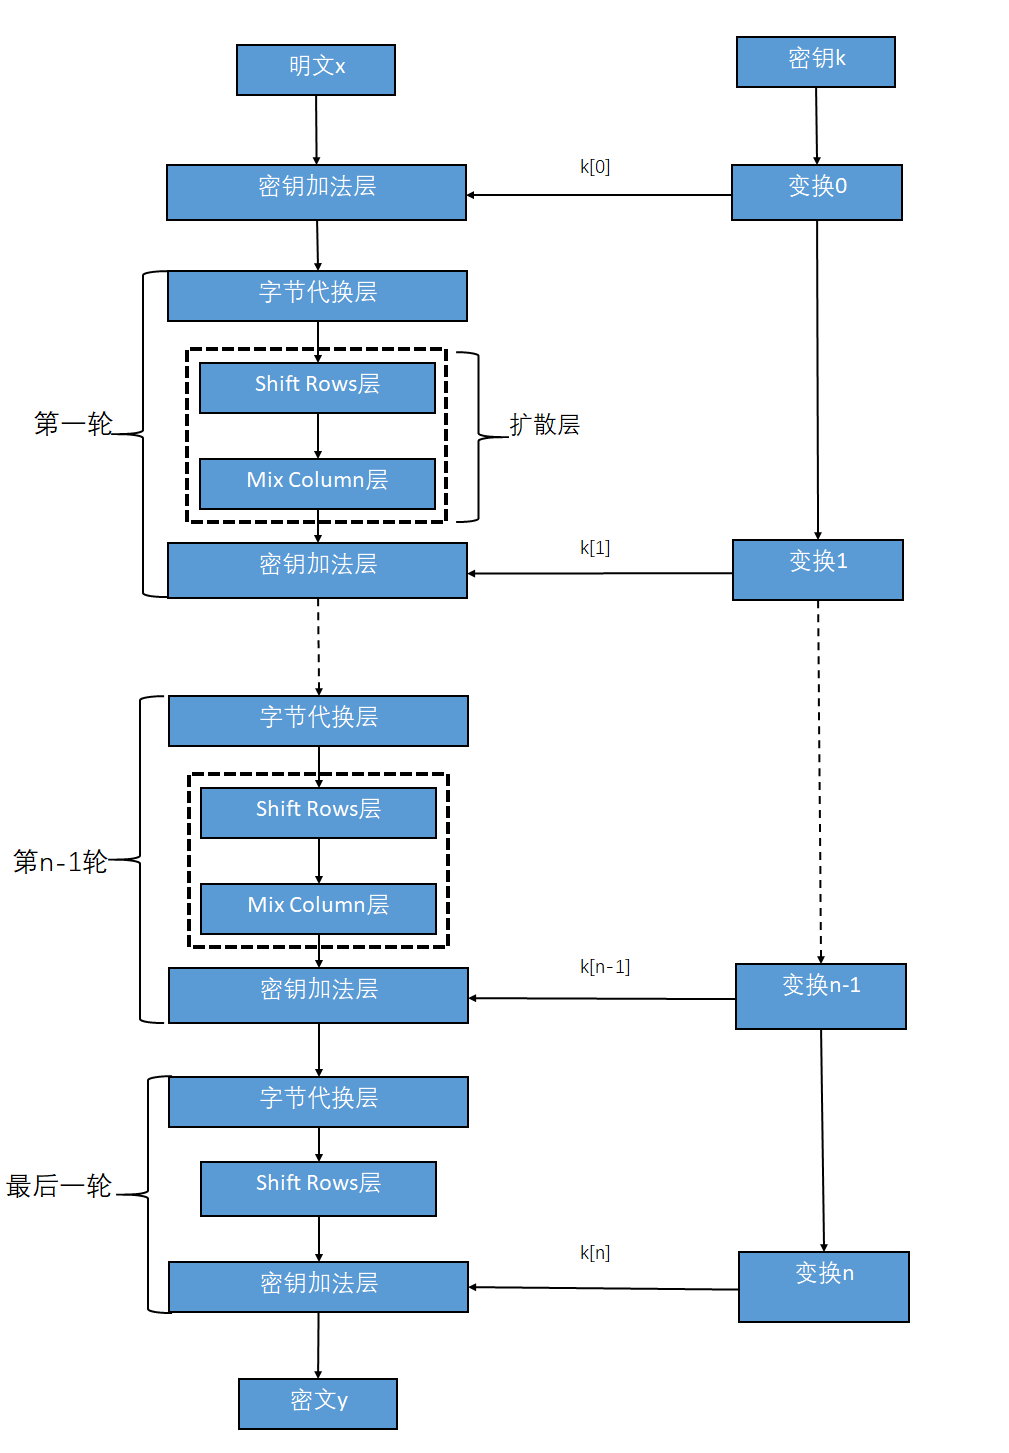
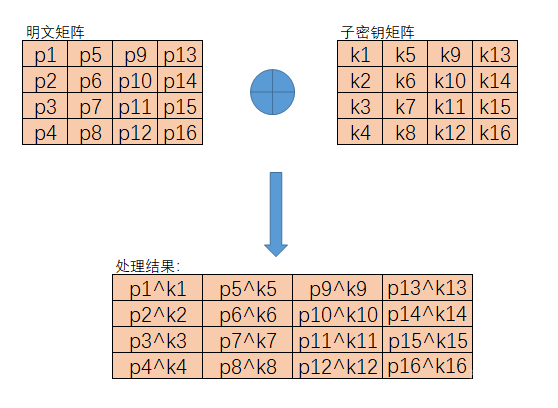
We can see that in the part of Add Round Key, there are two input parameters, the plaintext and sub secret key k[0].
In fact the k[0] is equal to k, we will explain the reason in the secret generating.
We just XOR the plaintext x and k[0], like the graph below.
1 | int AddRoundKey(unsigned char(* PlainArray)[4], unsigned char(*ExtendKeyArray)[44], unsigned int MinColumn) |
Now we look at SubByte layer, which maps each byte of input data to another byte by S_box.
The method of calculating the S_box will be introduced in the latter part, so now we assume it has been calculated.
S_box is an array with 256 elements namely 16 by 16 and the form of the element is byte.
If we define the S_box as a two-dimension array, then reading this array should regard the higher four bits as the first index, and the lower four bits as the second index, namely 4bit=16 and 16x16=256 elements!
Inverse S_box corresponding to S_box, which is used to process the data when decoding the data, called inverse byte substitution.
S_box
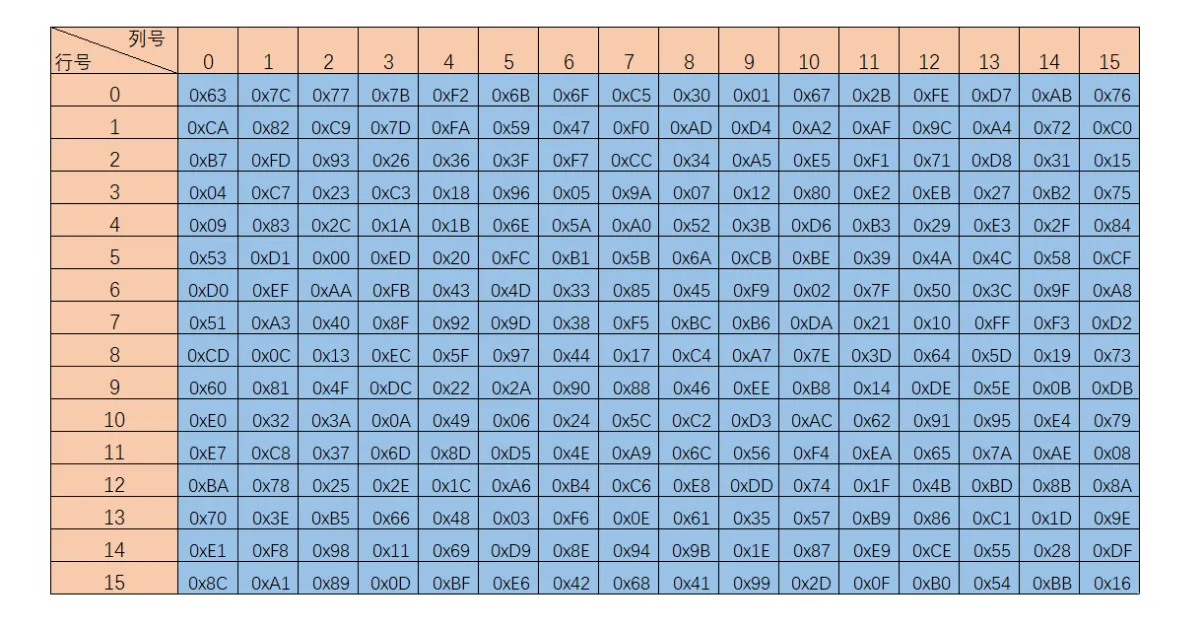
inverse S_box

The process of SubByte
1 | //S_box |
The ShiftRows is just a matrix performance:

We remain the first row, then the second row is moved one-bit left, and the third row is moved two-bit left, similar to the last row.
1 |
|
Now that we have the ShiftRows in the Encoding process, we also have Reverse ShiftRow in the Decoding process.

And the code is exhibited above.
Mix Column(每一列乘状态矩阵,替换原来的列)
It will mix each column of input matrix, which enables each input byte to impact four output bytes.
In the forward column mixtion, we use a 4 by 4 fixed matrix left multiply the input matrix. However their addition, multiplication will run in the field of GF(2^8).
1 | int MixColum(unsigned char(*PlainArray) [4]) |
In the decoding process, we just use the inverse matrix.
Note: we should finally transform the ciphertext from bytes matrix to strings!
AES secret key
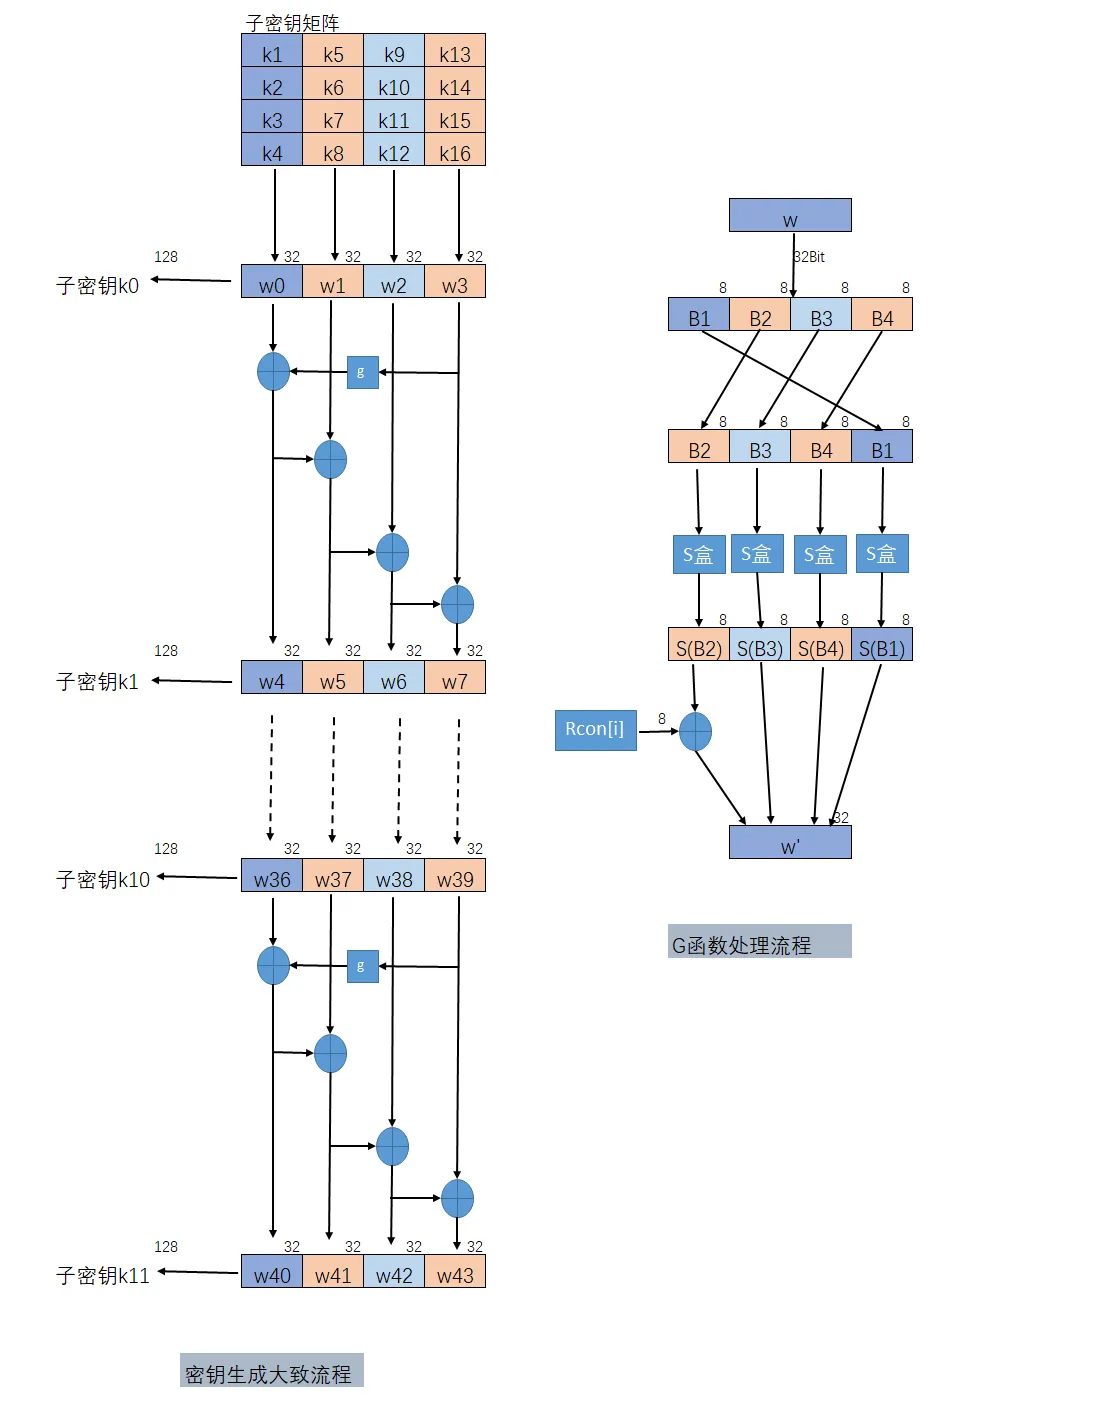
The column of subkey matrix can be regarded as the element. One column has 32 bits, so the four are totally 128bits.
The number of generated subkeys are one more than the turns of AES.
Key schedule is to expand the secret key to 10 secret keys namely 40 columns!
Look at the picture above! When we reach the w[0], w[4], w[8] and all w[i] and i can be divided by 4, we should use g(x) to process w[0], w[4]….. Look at the picture about on the right.
If we wanna get w[4]!
We write w[3] as a row, and then put the B1 into the tailer, we make B2, B3, B4 move forward. Finally we use S_box to map each B. and then add a round constant Rcon to the first number of transformed w to obtain w’.
Finally XOR the w’ (from w3) and W0 to get the w4!
If we wanna get w[5](namely i cannot be divided by 4)
Just XOR the w[i-1] and w[i-4]!
Repeat the above process to get 10 groups Round keys.
generate the ciphertext
We use Round key to XOR our plaintext matrix column by column!
And we repeat 10 times in AES-128, 12 times for AES-192, 14 times for AES-256
1 |
|
When in the decoding course
We just subtitude the S_box to inverse_S_box, Shift Rows to Inverse Shift Rows, Mix Columns to Inverse Mix Columns!
 wechat