
RAN仿真实现学习
安装Open5GS
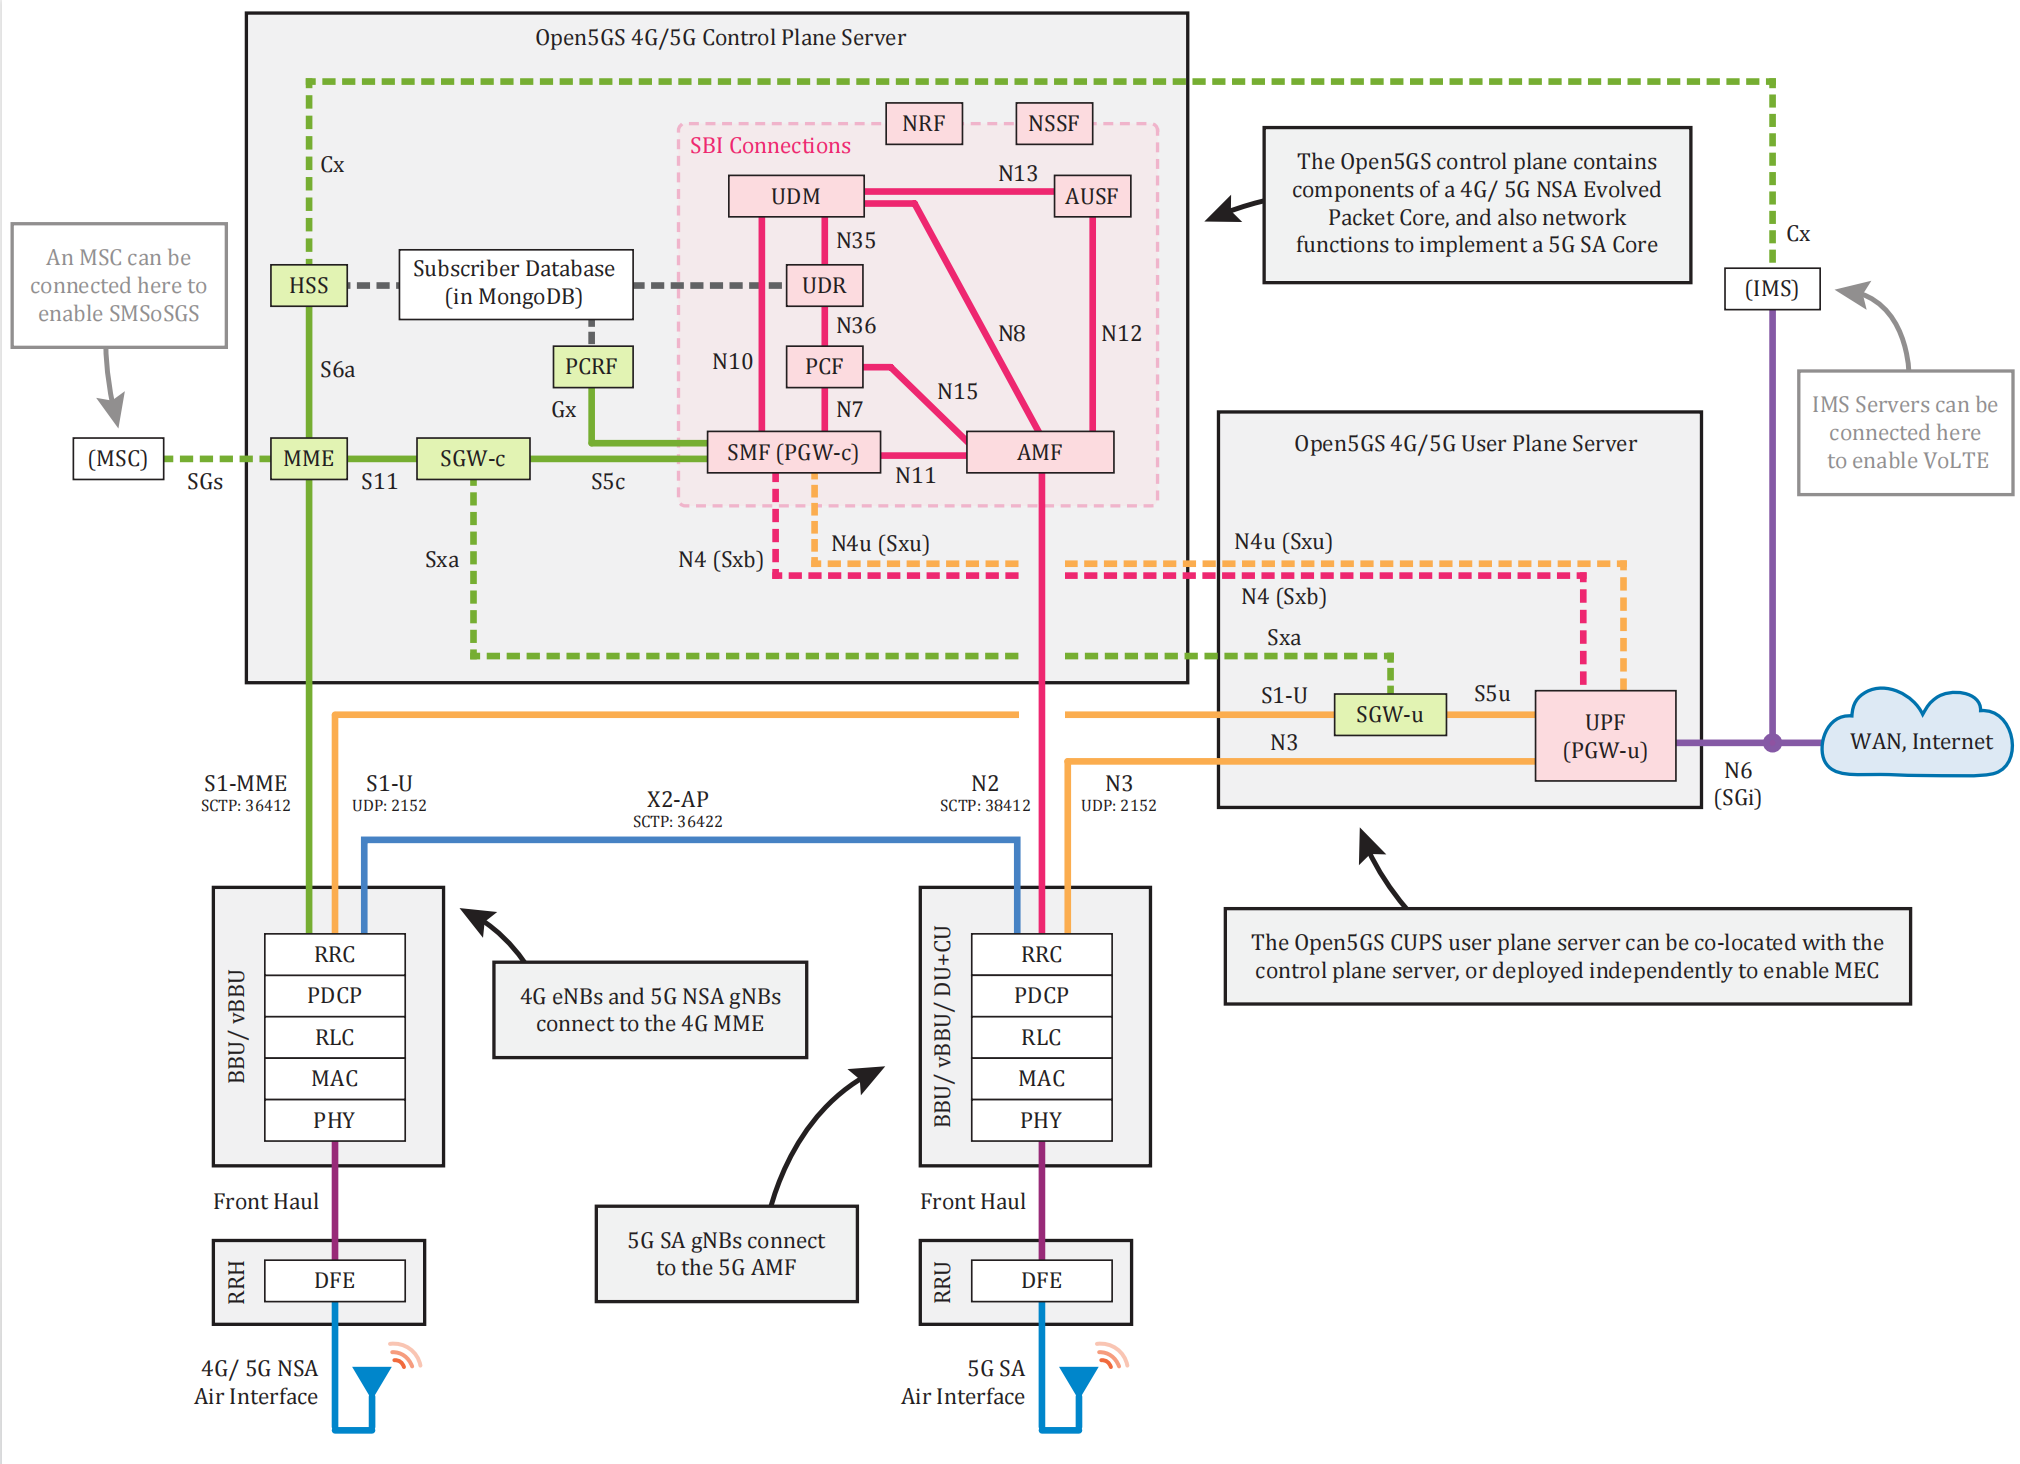
Open5GS core结构如图所示:
Next time we will complement the explanations of each component.
Install Open5GS with a Package Manager
Here we should import the public key used by the package management system.
1 | sudo apt update |
Then we will create the list file /etc/apt/sources.list.d/mongodb-org-6.0.list for your version of Ubuntu.
Universally we use Ubuntu 22.04
1 | echo "deb [ arch=amd64,arm64 signed-by=/usr/share/keyrings/mongodb-server-6.0.gpg] https://repo.mongodb.org/apt/ubuntu jammy/mongodb-org/6.0 multiverse" | sudo tee /etc/apt/sources.list.d/mongodb-org-6.0.list |
Then the most important step is to install the Mongodb database.
1 | sudo apt update |
If you are using an arm-based machine, like ubuntu22.04 on raspberry 4B or a virtual machine, there will be a question that it will exhibit a “core-dumped” error, which is due to the need of specific architecture, so we recommend https://github.com/themattman/mongodb-raspberrypi-binaries, providing a viable version.
Using its steps, we will also encounter questions like
1 | ./mongod: error while loading shared libraries: libcrypto.so.1.1: cannot open shared object file: No such file or directory |
But in ubuntu 22.04, libssl1.1 is not supported anymore, so we will try to install this old version, through
wget http://ports.ubuntu.com/pool/main/o/openssl/libssl1.1_1.1.1f-1ubuntu2_arm64.deb
thensudo dpkg -i libssl1.1_1.1.1f-1ubuntu2_arm64.deb.Finally we can check the installation,
1 | dpkg -l | grep libssl |
And run the mongod through
1 | ./mongod --dbpath /data/db/test_db --fork --logpath /data/db/test_db/mongod.log --port 28080 |
./mongod: This starts the MongoDB server. It assumes that the mongod executable is located in the current directory.
--dbpath /data/db/test_db: Specifies the directory where the database files will be stored. In this case, it is set to /data/db/test_db, which means all data will be stored in this directory.
--fork: This option runs the MongoDB server as a background process. This is commonly used in production environments.
--logpath /data/db/test_db/mongod.log: Specifies the path to the log file where the MongoDB server will write its logs. Here, it is set to /data/db/test_db/mongod.log.
--port 28080: Specifies the port on which the MongoDB server will listen. The default port is 27017, but in this case, it has been changed to 28080.
Then
1 | ./mongo --port 28080 # run queries! |
It opens the shell where you can run queries.
Note: mongo is the client and mongod is the server!
We can see the printed content
1 | MongoDB shell version v7.0.11 |
and
1 | This server is bound to localhost. Remote systems will be unable to connect to this server. Start the server with --bind_ip <address> to specify which IP addresses it should serve responses from, or with --bind_ip_all to bind to all interfaces. If this behavior is desired, start the server with --bind_ip 127.0.0.1 to disable this warning |
So if we want to access this server, we should bind the external ip address, or just —bind_ip_all.
Then for convenience, we write this service into a system service file, using vim /etc/systemd/system/mongod.service
1 | [Unit] |
Then we should create he PIDFile and give it the right.
1 | sudo mkdir -p /run/mongodb |
Finally
1 | sudo systemctl daemon-reload |
run
1 | sudo systemctl start mongod |
check
1 | sudo systemctl status mongod |
then add to the start item, when the computer starts, the service will run.
1 | sudo systemctl enable mongod |
Install the webUI of Open5GS
1 | Download and import the Nodesource GPG key |
Run these commands and then install the webUI through
1 | curl -fsSL https://open5gs.org/open5gs/assets/webui/install | sudo -E bash - |
Finally we will get the default username and passwd, accessing http://localhost:9999
Or we can correct the /usr/lib/node_modules/open5gs/server/index.jsand listen to 0.0.0.0substituting localhost。
1 | Username:admin, Password:1423 |
Simulation of Open5GS
User device:
1 | sudo ./srsue ue_zmq.conf |
gNB:
1 | sudo ./gnb -c ./gnb_zmq.yaml |
 wechat